Thursday, January 31, 2013

Sack Time

I LOVE paper sacks!!!  Something about them, no matter the size, screams CREATE to me!  I confess, I hoard sacks. No, I'm not telling where I put them! :)

Supplies...
Lunch Sack
Cardstock..More Mustard, Very Vanilla and Raspberry Ripple
Designer Series Paper Stack...Print Poetry 
Stamp Set...Ciao, Baby!
Punches...Petite Curly Label (FREE with a $50 order during Sale-A-Bration, 3/4 Circle Punch, 1" Circle Punch and Blossom Punch
Adhesive...Snail and Glue Dots
Natural Trim.

What do YOU hoard to use in creating???

Enjoy your day!


Wednesday, January 30, 2013

Thank You

I admit, right off the bat, this card is missing something and I didn't quite figure that out until I had already mailed them out:(  I'm thinking maybe a scrunched up flower of some kind.  Next time, right? I do love the look of the paper piercing on the Always Artichoke Label.  Amazing what a few placed holes does to the overall look of a card:)  I needed a few thank you cards and didn't want to just say thanks on the front.  That is the beauty of alot of Stampin'Up! sayings, you can use them for all sorts of occasions and reasons.

Supplies...
Stamp Set...Vintage Verses (FREE with a $50 order during Sale-A-Bration)
Ink...Always Artichoke
Cardstock...Always Artichoke, Sahara Sand and Very Vanilla
Designer Series Paper...Tea For Two
Labels Collection Framelits
Festive Paper Piercing Pack.
Adhesive...Snail and Stampin'Dimensionals

I hope you take the time and send thank you cards when you need to.  My mom taught us to whenever we received a gift of any kind and we have tried to instill that in our own children. Let's keep that tradition going, what do you say?

Paula

Tuesday, January 29, 2013

Shopping Bags

Is it just me or do any of you save your bags from shopping that have handles?

When you are in a rush and need to get to that birthday party only to find out the gift isn't wrapped yet, I have just the thing for you today:)  NOT my idea but rather, I came across a bag that I had saved from Convention, years ago. We made it as one of our make n takes. I took the same idea and changed it up.  All I did was cut cardstock and Designer Series Paper to fit the bag I had on hand:)  Seriously you could leave it like that OR...stamp and punch and adhere something fun to the bag.

Supplies used...
Handled bag
Cardstock...Real Red, Whisper White and Basic Black
Designer Series Paper...Polka Dot Parade
Ink...Real Red
Stamps...Mixed Bunch
Punches...Blossom Punch and 1" Circle.
Sticky Strip

Quick!  Go shopping and find something that needs wrapped:) No one says you have to have a special occasion in order to share something fun with a friend!

Paula

Monday, January 28, 2013

Creped Filter Paper

If you haven't yet tried Stampin'Up!s Creped Filter Paper, you need to!  I really don't have much room to talk tho...this is the first time I opened it up and actually played with it and might I just say...AWESOME!  After using our scallop punches, in three different sizes, I spritzed said punched scallops:)  I added some rubbing alcohol into our Stampin'Spritzer along with a few drops of Raspberry Ink Refill plus a few drops of Shimmer Paint.  Gave it a few good shakes and simply sprayed them!  I took each single punched piece and "smooshed" it in my hand.  Character ya know:)  I connected all the layers with a single brad and simply added the large pearl!  I wish you could see the glimmer on the flower in person:)

The sky is the limit with this paper!!!!!  Use your imagination with shapes and colors and have a blast!
Supplies...
Crepe Filter Paper
Large Pearl Basic Jewels, Vintage Trinkets, Shimmer Paint in Frost White
Stampin'Spritzer
Cardstock..Basic Gray and Pretty In Pink
Large Scallop Edgelits Delicate Designs Folder
Punches...1 3/4, 1 1/4 and 7/8 Scallop Punches

Thanks for sharing your day with me:)
Ink Refill...Raspberry Ripple

Friday, January 25, 2013

Mason Jars

Happy Friday! 

I awoke to a winter wonderland and it is STILL coming down!  After realizing that I had to go out in it to run some errands, I decided to treat myself to some sunshine in a jar:)  Sometimes all a gal needs is Spring Flowers in the middle of winter right?

It is so easy to transform a plain jane mason jar with just a few strips of paper!  I tried some rickrack around the center and decided I liked the simplicity of the paper instead.  I hope to create more jars as time goes on simply to see what all I can come up with!  Quick, go grab a jar from the pantry or wherever you stash your pickle jars, and see what YOU can come up with! I'd love to hear what you do with them:)

Supplies...
Designer Series Paper in Polka Dot Parade
Whisper White Cardstock

Stay safe and warm!

Paula

Wednesday, January 23, 2013

Imagination

Happy Hump Day!  It is like a deep freeze here in Ohio and I'm ready for the flowers to start blooming instead of seeing my breath! :)

Sometimes it is fun to challenge myself to see what I have around the house to use in a creative way.  If you ever browse Pinterest, you will see plenty of toilet paper roll items.  I know, right?  But....they are quite fun to use, if for nothing else, a gift card or a name place holder for the table.  I actually painted this one awhile ago and put it aside until an idea struck me.  Thankfully it didn't hit too hard:)  Sorry, bad humor I know!

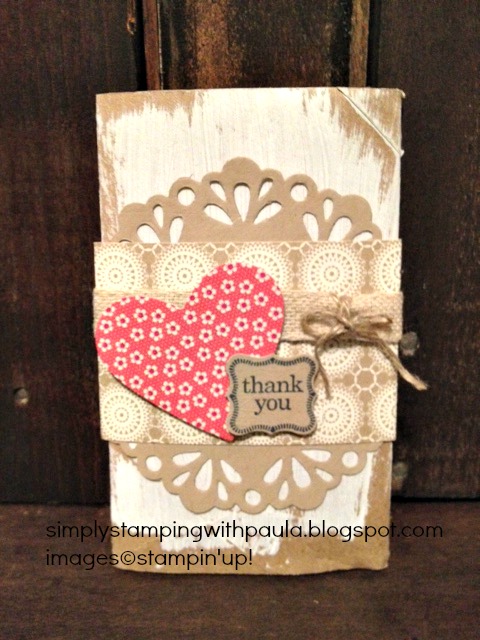
By simply swiping a few strokes of White Gesso Paint across a flattened toilet paper roll, you can start to see a bit of shabby chic come to life.  You could also swipe ink on it instead if that trips your trigger.  Pretty self explanatory from the pic so here it is.....my toilet paper roll artsy'ed up!

Supplies used...
Toilet paper roll
Sizzlits Large Delicate Doilies
Paper Piercing Tool
White Gesso
Cardstock...Crumb Cake, Print Poetry Designer Series Paper Stack
Hearts Collection Framelits
Ink...Night of Navy
Stamps...Pretty Petites (Sale-A-Bration Set FREE with $50 purchase)
Punch...Petite Curly Label (Sale-A-Bration item FREE with $50 purchase)
Stampin'Dimensionals, Tombow Multi Liquid Glue
Natural Trim and Linen Thread

Save a few toilet paper rolls and see what creative ideas jump into your mind and let me know!

Paula

Tuesday, January 22, 2013

Sale-A-Bration

It's finally here!  Sale-A-Bration is the largest sale that Stampin'Up! has each and every year!!!  Until I can figure out how to add the info, you are stuck with me trying to describe the perks of said sale......
   For every $50 spent on product, you are able to pick, from the Sale-A-Bration Brochure, an item FREE!
   For hostessing a workshop or book party, if your orders total $150, you receive a FREE pack of silver glimmer paper, in honor of Stampin'Up!s 25th Anniversary and you will have $25 credit to use towards anything in the regular catalog or Spring catalog.
   For a $400 workshop or book party, you would receive the silver glimmer paper, an All Bundled Up grouping which includes Sycamore Street Designer Series Paper, Sycamore Street Ribbon and Button Pack and the Madison Avenue Stamp set....PLUS  $65 Hostess Bucks to use towards anything in the regular catalog and Spring catalog AND 50% off one item!!! 
   If you choose to sign up as a Demonstrator, the cost is $99 and you are able to choose $156.50 worth of product and NO shipping on your kit!

Please feel free to head over to www.stampinup.com and check out all the details on the customers page!  If you choose to participate in any way, please type in my name as your Demonstrator and I would be forever thankful:)

Thank you for stopping in and bundle up! It's a bitter one out there today!

Paula


Monday, January 21, 2013

Helpful

On this snowy day, I have stampers block.  FOR SHAME!  It happens and today it is my turn to get thru it:)  Sometimes, when you find a card that you like, after you have made it, duplicate it so that you always have a go to when the need arises.  Today the need arose:) 

The From My Heart set is such an easy "go to" set to have on hand!  How ironic that the stamp used on this card is a quote from James Taylor, who, just happens to be singing right at this very moment on tv!  Nope, not planned!  By using the Paper Piercing Pack, it helps give this card depth as does the sponging of Early Espresso on the edges. 

Product used...
Cardstock...Crumb Cake, Early Espresso, Very Vanilla and Tangerine Tango
Tools...Essentials Paper Piercing Pack, Stampin'Pierce Mat, Paper Piercing Tool, Pearl Basic Jewels, Tombow Multi Liquid Glue and Stampin'Dimensionals
Stamp Set...From My Heart
Punch...Boho Blossoms
Oval Accent Bigz Clear and Apothecary Accents Framelits

May your day be full of smiles and creativity!

Paula


Friday, January 18, 2013

Chalkboard

Happy Friday!  Hope that everyone is all set to sit back and enjoy a fabulous weekend:)

I want to share my new favorite technique today.  For one, I LOVE shabby chic anything and this chalkboard technique screams shabby to me!  I think the biggest tip I can share is to NOT over think and try and make it all perfect because how many chalkboards have you seen that have been used are perfect? Exactly!  By sponging onto the edges of your black cardstock with White StazOn Ink and smooshing the sponge anywhere on same black cardstock that you would expect eraser markers on a true chalkboard. Oh man I hope I am making sense to you:) You can also, as I did, take a white water color pencil or a true piece of chalk and draw doodads or scribble lines, you name it, you can do it!  That all gives it a chalkboard look:)

I took our 1 1/4 inch scallop circle punch and punched out 6 circles out of the Designer Series Paper and simply put one at a time, in my hand and smooshed and crumpled it.  I had a 7th one punched out that I left alone and simply starting by putting a glue dot on each crumpled piece and arranged them on the flat circle in order to create a flower.  Nothing fancy about the leaves, I just took scissors and free cut two leaves, smooshed those as well and attached under the flowers.  I hope by looking at my example, it will be easier for you to see what I have done versus trying to understand my mumbo jumbo on this Friday afternoon!

Supplies used...
Cardstock..Basic Black. Raspberry Ripple  and Designer Series Tea For Two
Tasteful Trim Bigz XL
Glue Dots
1 1/4 Scallop Circle Punch
White water color pencil
White StazOn Ink Pad
Sponge Dauber
Pearl Basics Jewels (chalkboards need a little bling every once in awhile:) )

Have a terrific weekend and please stop in again...I love the company!

Paula


Thursday, January 17, 2013

Hearts

I'm awfully excited to see my sister in law tonite and decided I needed to give her just a little something:)  In no time at all I was able to whip up this Valentine that I plan on putting magnetic strips on the back for her fridge.  I figure everyone needs something made with love on their fridgeadidge right?  Did I mention that there are no stamps used on this? Sometimes you just have to play with paper!

Supplies used...
Cardstock...Early Espresso and Designer Series Paper Tea For Two (LOVE)
Stampin'Pierce Mat and Paper Piercing Tool
Occasions Piercing Pack (by using these, it's a great way to add detail in a short amount of time)
Linen Thread, Natural Trim,  Stampin Dimensionals
Framelit Dies..Hearts a Flutter and Hearts Collection
Small Heart Punch.
Adhesive..Snail

Have a terrific Thursday and hope to see you soon!

Paula


Wednesday, January 16, 2013

Versatility

One of the gazillion reasons I fell in love with Stampin'Up! was their sets!  Everything in a set goes together and you don't have to second guess if the style goes well together.  I'm using the same set as I did yesterday but with a different color scheme and purpose.  This one will be going to my Yoga teacher at Church tonight.  She gives up her family time to help us all relax and whatever else anyone soaks up from Yoga. Yep, I'm a newbie at it and it's a true challenge, each and every move but ohhhhhh so worth it!  This thank you was totally made with her in mind, hope she likes it :)


Texture adds so much to a card and our Embossing Folders fit that bill in a heartbeat!  Please never feel obligated, in any way, to read all of the particulars of items...my reasoning to list them is for those that want to duplicate or use said items in a different fashion. Or, simply to add to your stash of stamping toys:)

Cardstock...Sahara Sand, Very Vanilla and Primrose Petal
Ink Pad...Sahara Sand
Markers...Primrose Petals and Gumball Green.
Stamp Set...Oh, Hello
Accessories...Linen Thread, Stampin Dimensionals and Snail Adhesive
Framelits Dies...Ovals Collection

THANK YOU for all of your wonderful comments yesterday! Made my day!!!  For some reason, some of you were not able to find my "shop" button...sometimes you might need to go to the bottom of the page and click "web version"...don't ask, I don't have a clue :)

As always, thanks for stopping in:)

Paula

Tuesday, January 15, 2013

Ready, set, go!

Ready, set, go!

Welcome to my blog!  My name is Paula and I am here to share my love of stamping and creating:)  I hope that you find yourself happy and glad that you stopped by.  I have never blogged before and rest assured, grammer is NOT my strong point.  So please sit back, sip something soothing and enjoy the ride.

I've been a rubber stamper for almost 19 years now and it still brings me joy to create a card or gift for others.  My goal is to share what I love and hopefully inspire you along the way.  If you find yourself wanting to create as well, feel free to hit the Shop Now button and browse the catalog.  Yep, it's a one stop shop!

My first card I want to share is using one of the brand new sets from the Spring Catalog, Oh, Hello as well as the Textured Impressions Embossing Folders, Tea For Two Designer Series Paper, First Edition Specialty paper and Very Vanilla Cardstock.  I also used the Delicate Doilies Sizzlits and the Honeycomb Textured Impressions Embossing Folder.


Please feel free to share thoughts and suggestions but please be kind and gentle:)  I may be an old timer stamper but this blogging has me just a tad bit nervous:)

Thanks for stopping and hope you stop back in again!

Paula